.png)


Your AWS invoice shows you a number. It doesn’t tell you which team ran up $47K in EC2 last month, which project’s RDS instance is billing at full on-demand rate, or whether that $12K Lambda spike was production or someone’s dev environment that never got torn down.
Cost allocation tags fix the visibility problem. This guide covers everything: what they are, how to set them up step by step, the exact mistakes that cause them not to appear in Cost Explorer, what a real tagging strategy looks like, and critically what you do once you can actually see the waste.
What Are AWS Cost Allocation Tags, Exactly?
AWS Cost Allocation Tag: A key-value pair attached to an AWS resource that, once activated in the Billing and Cost Management console, appears as a filterable and groupable dimension in Cost Explorer, AWS Budgets, Cost and Usage Reports (CUR), and Cost Categories. Tags do not affect resource behavior or performance, they are metadata used exclusively for cost attribution.
A tag looks like this:
Key: Team
Value: payments-engineering
or:
Key: Environment
Value: production
Once activated, every dollar spent by a resource carrying that tag becomes attributable to the tag’s value in your billing reports. This is how you answer: “How much did the payments team spend last quarter?” or “What is our production vs. staging cost split?”
AWS-Generated Tags vs. User-Defined Tags: What’s the Difference?
AWS provides two types of cost allocation tags. Understanding the distinction matters because they are activated separately and serve different purposes.
AWS-Generated Cost Allocation Tags
AWS automatically creates these tags. The most common is aws:createdBy, which records the IAM identity (user, role, or service) that created a resource. Starting December 2025, AWS also supports account-level tags from AWS Organizations as cost allocation tags, meaning tags applied to accounts in your AWS Organizations console automatically propagate to all metered usage within those accounts (verify at docs.aws.amazon.com, this feature is generally available in all regions excluding GovCloud and China regions).
AWS-generated tags are useful for governance and audit trails. They are not a substitute for a user-defined tagging strategy.
Limitations of AWS-generated tags:
- You cannot customize the key names
- aws:createdBy only shows who created a resource, not which team owns it or which project it belongs to
- They cannot encode business context (cost center, product line, environment)
User-Defined Cost Allocation Tags
These are tags you create and apply. You define both the key and the value. They are the foundation of any meaningful FinOps practice.
Examples of high-value user-defined tag keys:
| Tag Key | Example Values | Purpose |
| Team | payments, platform, data-eng | Team-level cost showback |
| Environment | production, staging, dev, sandbox | Env cost split |
| CostCenter | CC-1042, CC-2087 | Finance chargeback |
| Project | ml-pipeline, checkout-v2 | Project-level budgeting |
| ManagedBy | terraform, cloudformation, manual | Governance / drift detection |
| Application | payments-api, auth-service | Service-level cost attribution |
| Owner | [email protected] | Resource accountability |
How to Activate AWS Cost Allocation Tags: Step-by-Step
This is where most teams get stuck. Applying a tag to a resource is not the same as activating it as a cost allocation tag. These are two separate steps. Miss the second one and your tags will never appear in Cost Explorer.
Prerequisites
- You must be signed in to the management account of your AWS Organization (or a standalone account not in an organization). Member accounts cannot activate cost allocation tags, only the payer/management account can.
- You must have the necessary IAM permissions: ce:UpdateCostAllocationTagsStatus, ce:ListCostAllocationTags.
- The tagged resources must have already incurred charges before Cost Explorer can show cost data for those tags.
Step 1: Apply Tags to Your Resources
Use one of these methods:
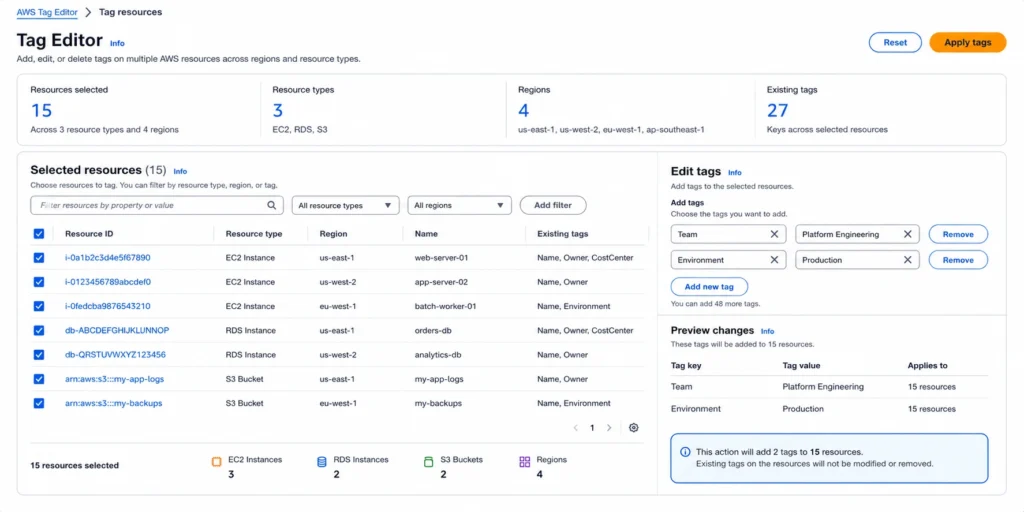
AWS Tag Editor (recommended for bulk tagging):
- Open the AWS Management Console
- Navigate to Resource Groups and Tag Editor
- Search for resources across services and regions
- Apply tags in bulk
AWS CLI:
aws ec2 create-tags \
–resources i-1234567890abcdef0 \
–tags Key=Team,Value=payments-engineering
IaC (Terraform example):
resource “aws_instance” “app_server” {
ami = “ami-0c55b159cbfafe1f0”
instance_type = “t3.medium”
tags = {
Team = “payments-engineering”
Environment = “production”
CostCenter = “CC-1042”
Project = “checkout-v2”
ManagedBy = “terraform”
}
}
Step 2: Wait Up to 24 Hours
After applying tags to resources, AWS needs up to 24 hours for those tag keys to appear on the Cost Allocation Tags page in the Billing console. This is a processing delay, not an error. Do not skip ahead.
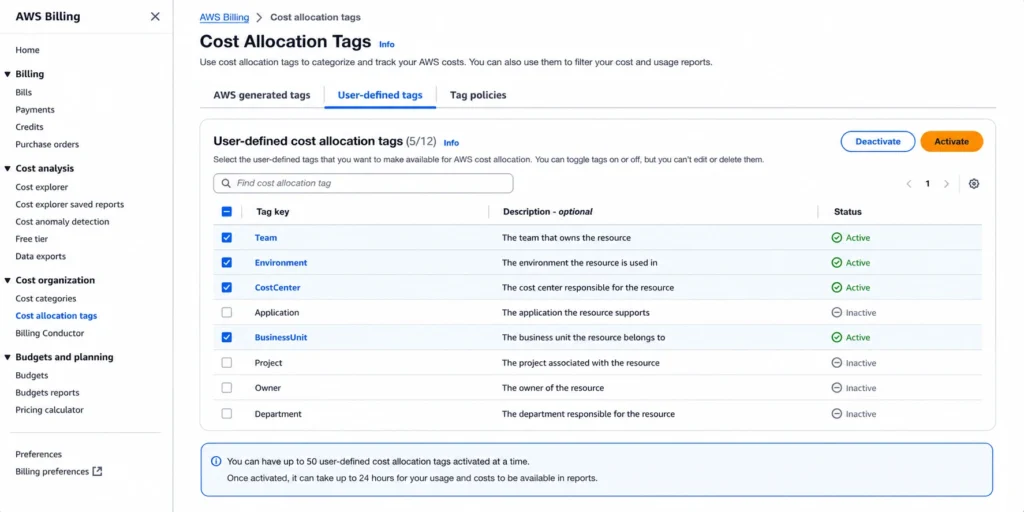
Step 3: Activate the Tags in the Billing Console
- Sign in to your management account
- Open the AWS Billing and Cost Management console at console.aws.amazon.com/costmanagement/
- In the left navigation pane, choose Cost allocation tags
- You will see two tabs: AWS-generated tags and User-defined tags
- Select the tag keys you want to activate
- Click Activate
Step 4: Wait Another 24 Hours
After activation, it takes up to another 24 hours for the tags to start appearing in Cost Explorer and billing reports. Total delay from “I applied a tag” to “I can filter by it in Cost Explorer” can be up to 48 hours. Plan accordingly.
Step 5: Verify in Cost Explorer
- Open Cost Explorer at console.aws.amazon.com/cost-management/home
- Add a filter or group by using the Tag dimension
- Select your activated tag key and filter by specific values
If tags still don’t appear after 48 hours, see the troubleshooting section below.
AWS Cost Allocation Tags: The 7 Most Common Setup Mistakes
Mistake 1: Activating Tags in a Member Account
The Cost Allocation Tags console is only accessible from the management (payer) account. If you’re trying to activate tags while signed into a member account, you won’t see the option. This is the single most common reason teams can’t activate tags.
Fix: Sign in to your management account, or contact the account owner who manages billing.
Mistake 2: Expecting Historical Data After Activation
Tags are not retroactive by default. When you activate a tag, Cost Explorer starts showing cost data associated with that tag from the activation date forward — not from the moment the tag was applied to the resource. Historical data before activation will show as untagged.
Fix: Activate tags as early as possible in your cloud journey. The longer you wait, the larger the gap in your cost attribution history. AWS does offer a limited backfill capability (verify at the billing console, availability may vary by account).
Mistake 3: Inconsistent Tag Values (Case Sensitivity)
AWS tag keys and values are case-sensitive. Production, production, and PRODUCTION are three different tag values. If your team uses all three inconsistently, Cost Explorer will split the data across three separate line items instead of aggregating them.
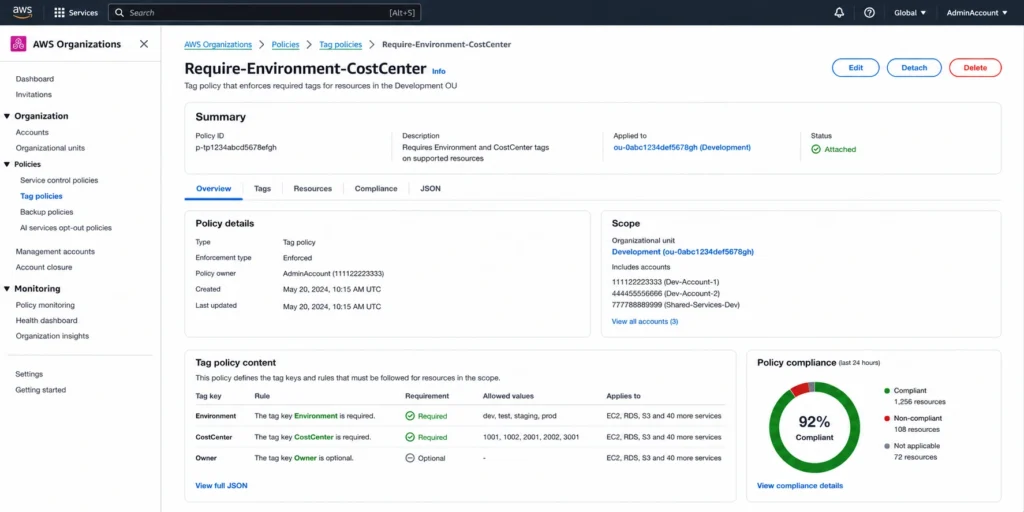
Fix: Enforce tag values through AWS Organizations Tag Policies or IaC validation. A tag policy example:
{
“tags”: {
“Environment”: {
“tag_key”: { “@@assign”: “Environment” },
“tag_value”: {
“@@assign”: [“production”, “staging”, “development”, “sandbox”]
},
“enforced_for”: {
“@@assign”: [“ec2:instance”, “rds:db”, “s3:bucket”]
}
}
}
}
Mistake 4: Not Tagging at Resource Creation Time
Retrofitting tags onto hundreds or thousands of existing resources is painful. IaC drift, manual resources, and managed services that don’t support tags all create gaps.
Fix: Enforce tagging at provisioning time through:
- IaC required tag blocks (Terraform required_tags variable)
- AWS Service Control Policies (SCPs) that deny resource creation if mandatory tags are missing
- AWS Config rules (required-tags) that alert on non-compliant resources
Mistake 5: Too Many Tag Keys (Tag Sprawl)
Teams often start with good intentions and end up with 30+ tag keys that nobody maintains consistently. Coverage drops, reports become noisy, and engineers stop trusting the data.
Fix: Start with 5-7 mandatory tags and enforce them strictly before adding more. The core set most FinOps practitioners recommend:
- Environment
- Team or Owner
- CostCenter
- Project or Application
- ManagedBy
Mistake 6: Ignoring Untaggable Resources
Not every AWS resource supports tagging. Data transfer charges, AWS Support fees, certain marketplace charges, and some service-specific line items cannot be tagged at the resource level. These show up as untagged costs in your reports.
Fix (as of December 2025): Use the new AWS Organizations account-level cost allocation tags. By tagging your accounts in AWS Organizations and activating those account tags, you can attribute even untaggable resources (refunds, credits, support fees) to the correct account grouping. This is a meaningful improvement for multi-account setups.
Mistake 7: Tags Not Applied to All Resource Types in a Service
For S3, for example, bucket-level tags are included in billing reports — but object-level tags are not. For ECS, you need to enable tag propagation from task definitions to the tasks themselves. Each service has specific tagging behavior.
Fix: Review the AWS service tagging documentation for each service you use. The AWS Well-Architected Framework’s Cost Optimization Pillar (COST03-BP05) covers this in detail.
AWS Cost Allocation Tags: Technical Limits
Know these before designing your tagging strategy (verify at docs.aws.amazon.com — limits may change):
| Limit | Value |
| Maximum tags per resource | 50 |
| Maximum active user-defined cost allocation tags per account | 500 |
| Tag key character limit | 128 characters |
| Tag value character limit | 256 characters |
| Allowed characters in keys/values | UTF-8; spaces allowed; some services restrict to alphanumeric, spaces, and _ . : / = + – @ |
| AWS-reserved tag key prefixes | aws: you cannot create tags with this prefix |
| Activation delay | Up to 24 hours to appear in activation list; up to another 24 hours after activation |
AWS Cost Allocation Tags in Multi-Account Environments (AWS Organizations)
For organizations running multiple AWS accounts, which is the recommended architecture for most enterprise workloads, tag management adds complexity.
Key rules for AWS Organizations:
- Only the management account can activate cost allocation tags for the entire organization
- Member account tags do NOT automatically become cost allocation tags; they must be activated from the management account
- If a member account moves to a different organization, all active cost allocation tags for that account are deactivated and must be reactivated by the new management account
- The new account-level cost allocation tags feature (GA December 2025) allows you to tag accounts in AWS Organizations and have those tags apply to all metered usage in that account; this is the recommended approach for multi-account attribution of untaggable charges
Recommended multi-account tagging architecture:
- Use AWS Organizations Tag Policies to enforce required tags across all accounts in an OU
- Activate account-level tags from the management account for top-level attribution (BU, division, product line)
- Use resource-level tags for granular per-team or per-service attribution within accounts
- Use AWS Cost Categories to create logical groupings on top of tags for reporting
Building a Tagging Strategy That Actually Survives Contact With Reality
Most tagging strategies fail not because the design is wrong, but because they’re designed in a spreadsheet and never enforced in infrastructure. Here’s what works.
The Minimum Viable Tag Set (Start Here)
Don’t attempt to tag for every possible use case on day one. Start with five tags that answer the questions your finance team is already asking:
- Environment — production | staging | development | sandbox
- Team or Owner — who is responsible for this resource
- CostCenter — maps to your finance chart of accounts
- Project or Application — the workload this resource serves
- ManagedBy — terraform | cloudformation | manual critical for governance
Enforce these five as mandatory before adding anything else.
Enforce at Provisioning, Not Retrospectively
The only scalable approach is preventing untagged resources from being created, rather than finding and fixing them after the fact.
Option 1: AWS Service Control Policy (SCP); deny creation without tags
{
“Version”: “2012-10-17”,
“Statement”: [
{
“Sid”: “DenyEC2WithoutRequiredTags”,
“Effect”: “Deny”,
“Action”: “ec2:RunInstances”,
“Resource”: “arn:aws:ec2:*:*:instance/*”,
“Condition”: {
“Null”: {
“aws:RequestTag/Team”: “true”
}
}
}
]
}
Option 2: AWS Config Rule; detect and alert on non-compliance
The managed rule required-tags checks that specified tag keys exist on resources. Non-compliant resources trigger an alert. This is less strict than an SCP (it doesn’t prevent creation) but is easier to start with in existing environments.
Option 3: IaC enforcement
If all infrastructure is managed through Terraform or CloudFormation, a required variable block and CI/CD validation gate prevents untagged resources from ever reaching AWS.
Tag Coverage Targets to Aim For
| Metric | Target |
| % of total spend with active cost allocation tags | 90%+ |
| Untagged resource spend as % of total | Less than 5% |
| Tag key consistency rate (values matching defined taxonomy) | 95%+ |
These numbers come from established FinOps practice. Your starting point will likely be lower, the value is having a baseline and a direction.
Decision Tree: Which Cost Allocation Approach Is Right For You?
START: Do you have more than one AWS account?│├── NO (single account)
│ │
│ └── Is your team fewer than 20 people with simple project structure?
│ │
│ ├── YES → Start with 3-5 user-defined tags (Team, Environment, Project).
│ │ Activate in Billing console. Use Cost Explorer to filter.
│ │ This is sufficient for most early-stage teams.
│ │
│ └── NO (complex single account, many teams/projects)
│ │
│ └── Use a full tag taxonomy (5-7 mandatory tags) + AWS Cost Categories
│ to create logical groupings for reporting. Consider migrating to
│ a multi-account architecture as you scale.
│
└── YES (multi-account / AWS Organizations)
│
├── Do accounts map cleanly to business units or teams?
│ │
│ ├── YES → Use ACCOUNT-BASED allocation as your primary model.
│ │ Activate the new account-level cost allocation tags (Dec 2025)
│ │ from AWS Organizations. Add resource-level tags for granularity
│ │ within accounts. This handles untaggable charges automatically.
│ │
│ └── NO (shared accounts, platform teams, cross-cutting services)
│ │
│ └── Use HYBRID model:
│ – Account-level tags for top-level BU/product attribution
│ – Resource-level tags for team/project/environment splits
│ – AWS Cost Categories to group and normalize for reporting
│ – Consider a third-party cost management tool if coverage gaps persist
│
└── Is tag compliance currently below 70%?
│
├── YES → Don’t add more tags. Fix compliance first.
│ Use AWS Config required-tags rule to identify gaps.
│ Retroactively tag using Tag Editor.
│ Enforce going forward with SCPs or IaC gates.
│
└── NO → Proceed with expanding your tag taxonomy and
integrating with AWS Budgets and Cost Anomaly Detection.
Connecting Tags to Action: What Comes After Visibility?
This is the question most tagging guides skip. Tagging tells you where your money is going. It doesn’t reduce the bill. Once you have tag-based visibility, the actual optimization work begins.
What You Can Do With Tag Data
- Team-level budgets and alerts (AWS Budgets) Filter an AWS Budget by tag to set a monthly cost threshold for a specific team or project. Get alerted before the threshold is breached, not after. Set alerts at 50%, 75%, and 100% of budget to give teams time to react.
- Cost anomaly detection (AWS Cost Anomaly Detection) Create a monitor scoped to a specific tag value. AWS will alert you when spend for that tag exceeds expected patterns. This is particularly useful for detecting runaway dev environments or unexpected batch job costs.
- Showback and chargeback Once you can attribute spend to teams and cost centers with reasonable accuracy, you can produce monthly cost reports (showback “here’s what you spent”) or internal billing (chargeback “here’s what we’re charging your cost center”). Both require reliable tag coverage.
- Rightsizing and commitment decisions Tag-based cost data lets you identify which environments or services have consistent, predictable spend, which is the precondition for making intelligent commitments (Reserved Instances, Savings Plans) rather than guessing at organizational aggregates.
- Lifecycle automation Tags like Environment=sandbox or Shutdown=weekends can be used to trigger automated start/stop schedules via AWS Lambda or Instance Scheduler, eliminating idle resource costs.
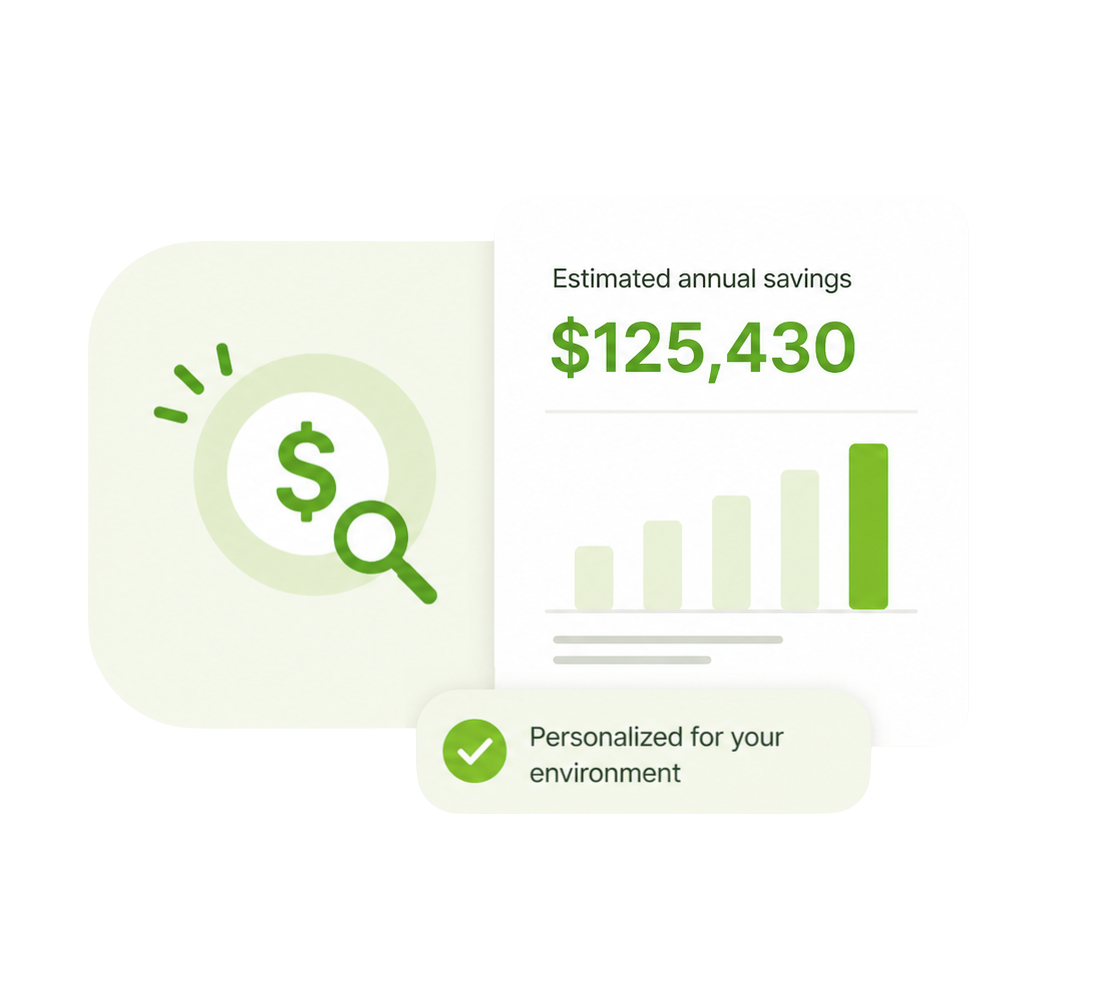
Tags show you the waste. See exactly how much you can cut from your AWS commitment spend with the Usage.ai AWS Savings Calculator. Takes 2 minutes, no signup required.
Tools That Use AWS Cost Allocation Tag Data
Once you have tags flowing correctly into Cost Explorer and CUR, several tools can build on top of that data. Here’s an honest comparison of the major options:
| Tool | Best For | Tag-Based Features | Notable Limitations |
| AWS Cost Explorer (native) | Basic cost visibility and filtering | Filter/group by any activated tag; create tag-based budgets | 72+ hour data refresh; limited automation; no commitment recommendations |
| AWS Budgets (native) | Alert on tag-based cost thresholds | Budget by tag key/value | Reactive alerting only; no root cause analysis |
| Usage.ai | Commitment automation and savings | Uses tag data to identify stable per-team/service baselines for automated RI/SP purchasing | Focused on commitment optimization, not general tag management |
| CloudHealth (VMware) | Enterprise multi-cloud governance | Tag compliance reporting, policy enforcement, chargeback | Complex setup; expensive at scale |
| Apptio Cloudability | Enterprise FinOps reporting | Showback/chargeback, business mappings on top of tags | Heavy implementation; best for large orgs with dedicated FinOps teams |
| Finout | Mid-market cost visibility | Virtual tags to retroactively attribute untagged spend | Newer platform; fewer integrations |
| Ternary | GCP-native FinOps | Strong tag-equivalent (label) support on GCP | Limited AWS native features |
How to choose:
Use AWS native tools if you’re early-stage, have a single account, and need basic visibility. They’re free and sufficient for teams spending under ~$100K/month.
Use a third-party FinOps platform when: you’re managing multiple accounts, you need showback/chargeback automation, your tag coverage is complex, or you’re spending enough that the ROI on a dedicated tool is clear.
Use a commitment automation tool like Usage.ai when you’ve established tag-based visibility and your next problem is: “we can see what we’re spending, now how do we reduce the unit cost of that spend?” That’s a separate problem from tagging, and it’s solved by optimizing your Reserved Instance and Savings Plan coverage, not by adding more labels.
AWS Cost Allocation Tags vs. AWS Cost Categories: Which One Do You Need?
These two features are often confused. They solve different problems and are often used together.
| Cost Allocation Tags | Cost Categories | |
| What it is | Metadata attached to a resource | A logical grouping rule defined in AWS Cost Management |
| Where it lives | On the resource itself (EC2, RDS, S3, etc.) | In the Billing and Cost Management console |
| Granularity | Resource-level | Can group accounts, services, tags, and charge types |
| Handles untaggable charges? | No (except account-level tags since Dec 2025) | Yes; can catch charges that don’t carry resource tags |
| Retroactive? | No (except limited backfill) | Yes; rules apply to historical data |
| Use case | Tagging resources to track cost at the resource level | Building a business-facing cost view on top of raw tags |
| Example | Tag: Team=payments applied to an EC2 instance | “Payments Team” category = all resources where Team=payments OR Account=112233445566 |
The recommended approach: Use tags at the resource level for granularity, and Cost Categories on top of tags to build the business-level view that finance teams actually consume.
Troubleshooting: AWS Cost Allocation Tags Not Showing in Cost Explorer
If your tags are applied but not visible in Cost Explorer, work through this checklist:
Step 1: Confirm you’re in the management account Member accounts cannot activate cost allocation tags. Check your account type at the top of the Billing console.
Step 2: Confirm the tags are activated Go to Billing console > Cost allocation tags > User-defined tags. Check the Status column. Tags must show “Active.”
Step 3: Confirm the resource has actually incurred charges A tag on a resource that has generated zero cost will not appear in Cost Explorer. The resource must have billing data associated with it.
Step 4: Check for case sensitivity mismatches Team=Payments and Team=payments are different values. Confirm the exact casing in Tag Editor matches what you’re filtering for in Cost Explorer.
Step 5: Check if enough time has passed
- After applying a tag: up to 24 hours to appear in the activation list
- After activating: up to another 24 hours to appear in Cost Explorer
- Total maximum delay: ~48 hours
Step 6: Verify the time range in Cost Explorer Set the time range to a period after the tag was both applied and activated. Tags are not retroactive, data before activation will show as untagged.
Step 7: Check S3 bucket vs. object-level tagging S3 includes bucket-level tags in billing reports but not object-level tags. If your S3 costs are missing tags, verify that the tags are on the bucket, not just the objects.
Step 8: Check ECS tag propagation settings ECS tasks require explicit tag propagation configuration. Verify that propagateTags is set to TASK_DEFINITION or SERVICE in your ECS configuration.
If none of the above resolves the issue, open an AWS Support case, there are known edge cases with specific services and tag propagation timing.
Frequently Asked Questions
1. What are AWS cost allocation tags?
AWS cost allocation tags are key-value metadata labels attached to AWS resources. Once activated in the Billing and Cost Management console, they appear as filterable dimensions in Cost Explorer, AWS Budgets, and Cost and Usage Reports. They allow you to attribute cloud spend to specific teams, projects, environments, or cost centers, turning a single aggregate AWS invoice into an itemized breakdown by any business dimension you define.
2. How long does it take for AWS cost allocation tags to appear in Cost Explorer?
Two delays apply in sequence. First, after applying a tag to a resource, it can take up to 24 hours for that tag key to appear in the Cost Allocation Tags activation list in the Billing console. Second, after activating the tag, it can take up to another 24 hours before it appears as a filterable dimension in Cost Explorer. The total maximum delay is approximately 48 hours. If tags are not appearing after 48 hours, see the troubleshooting checklist in this guide.
3. Are AWS cost allocation tags retroactive?
No, by default, cost allocation tags are not retroactive. Activating a tag today will show cost data associated with that tag going forward from the activation date. Historical data before activation will appear as untagged. AWS does offer a limited backfill capability for some cases. This is a strong reason to activate tags as early as possible.
4. Who can activate cost allocation tags in AWS Organizations?
Only the management (payer) account can activate cost allocation tags for an AWS Organization. Member accounts do not have access to the Cost Allocation Tags manager in the Billing console. If a member account moves to a different organization, its previously active tags are deactivated and must be reactivated by the new management account.
5. What is the difference between AWS-generated and user-defined cost allocation tags?
AWS-generated tags are created automatically by AWS, the most common is aws:createdBy, which records the IAM identity that created a resource. As of December 2025, account-level tags from AWS Organizations are also supported as AWS-generated cost allocation tags. User-defined tags are created by you: you define both the key (e.g., Team) and the value (e.g., payments-engineering). Both types must be activated separately in the Billing console before they appear in Cost Explorer.
6. How many cost allocation tags can I have?
AWS allows a maximum of 50 tags per individual resource. For cost allocation specifically, you can have up to 500 active user-defined cost allocation tags per management account (verify at docs.aws.amazon.com/awsaccountbilling — limits may change). In practice, most teams use 5-15 tag keys for cost allocation purposes. Keeping the mandatory set small (5-7 keys) and enforcing it strictly produces better coverage than having 30 keys with inconsistent application.
7. Why are my cost allocation tags not showing up even after activation?
The most common reasons: (1) you activated from a member account instead of the management account, (2) the tagged resource has not yet incurred charges, (3) case sensitivity mismatch between the applied tag and the filter in Cost Explorer, (4) less than 48 hours have passed since activation, (5) for ECS, tag propagation is not enabled on the task or service, (6) for S3, tags are applied at the object level rather than the bucket level. Work through the full troubleshooting checklist in this guide.
8. Do cost allocation tags reduce my AWS bill?
No. Cost allocation tags improve cost visibility, they tell you where your money is going. Reducing the bill requires separate action: rightsizing over-provisioned resources, eliminating idle resources, and optimizing your commitment coverage (Reserved Instances and Savings Plans) to reduce the unit cost of your consistent compute spend. Tagging is the prerequisite for all of those decisions, you can’t optimize what you can’t see.
9. What is the difference between cost allocation tags and AWS Cost Categories?
Cost allocation tags are applied to individual resources and track costs at the resource level. AWS Cost Categories are logical groupings you define in the Billing console, they can group multiple tags, accounts, services, and charge types into a single named category. Cost Categories can handle untaggable charges (like support fees and credits) and are retroactive. The recommended approach is to use both: tags at the resource level for granularity, and Cost Categories on top of tags to build the business-facing cost view that finance and leadership teams consume.