.png)
 AWS
AWS Microsoft Azure
 Google Cloud

The short answer
An Azure Savings Plan fits when your compute is still moving between VM families, regions, or services, because the discount follows your spend rather than a specific resource. A Reserved Instance fits when a workload has run unchanged for months and the deeper discount matters more than flexibility.That is only half the decision. The commitment cannot be cancelled or refunded, so what determines whether it was worth it a year later is utilization which is why the sizing below starts from a conservative usage floor.
What Is an Azure Savings Plan?
An Azure Savings Plan is a 1-year or 3-year commitment to a fixed hourly spend on eligible Azure services. In exchange, discounted rates apply automatically to the usage carrying the largest discount percentage first.Unlike a Reserved Instance, the commitment is not tied to a VM family, region, or operating system, it follows your usage wherever it goes. Once purchased, it cannot be cancelled, modified, or refunded.
There are two products.
- Savings Plan for Compute, launched in October 2022, offers up to 65% off, a ceiling based on one specific M64dsv2 Linux VM on a 3-year term in the East US, so treat it as a best case, not a plan.
- Savings Plan for Databases, launched March 18, 2026, offers up to 35% off eligible database services.
The core mechanic in one sentence: you are not reserving a resource. You are committing to a dollar amount, and Azure decides, hour by hour, which of your eligible usage gets the discount.
Compute vs Database Savings Plans
| Dimension | Savings Plan for Compute | Savings Plan for Databases |
|---|---|---|
| Max discount | Up to 65% | Up to 35% |
| Term options | 1-year or 3-year | 1-year only |
| Eligible services | Virtual Machines, App Service Premium v3/Isolated v2, Container Instances, Functions Premium, Dedicated Host, Container Apps, Spring Apps for Enterprise | Azure SQL Database (incl. Hyperscale, serverless), SQL Managed Instance, PostgreSQL, MySQL, Cosmos DB, DocumentDB, Database Migration Service |
| Covers storage or networking? | No | No |
| Launch date | October 2022 | March 2026 |
| Published savings range | 11–65% | 0–35% |
How an Azure Savings Plan Works
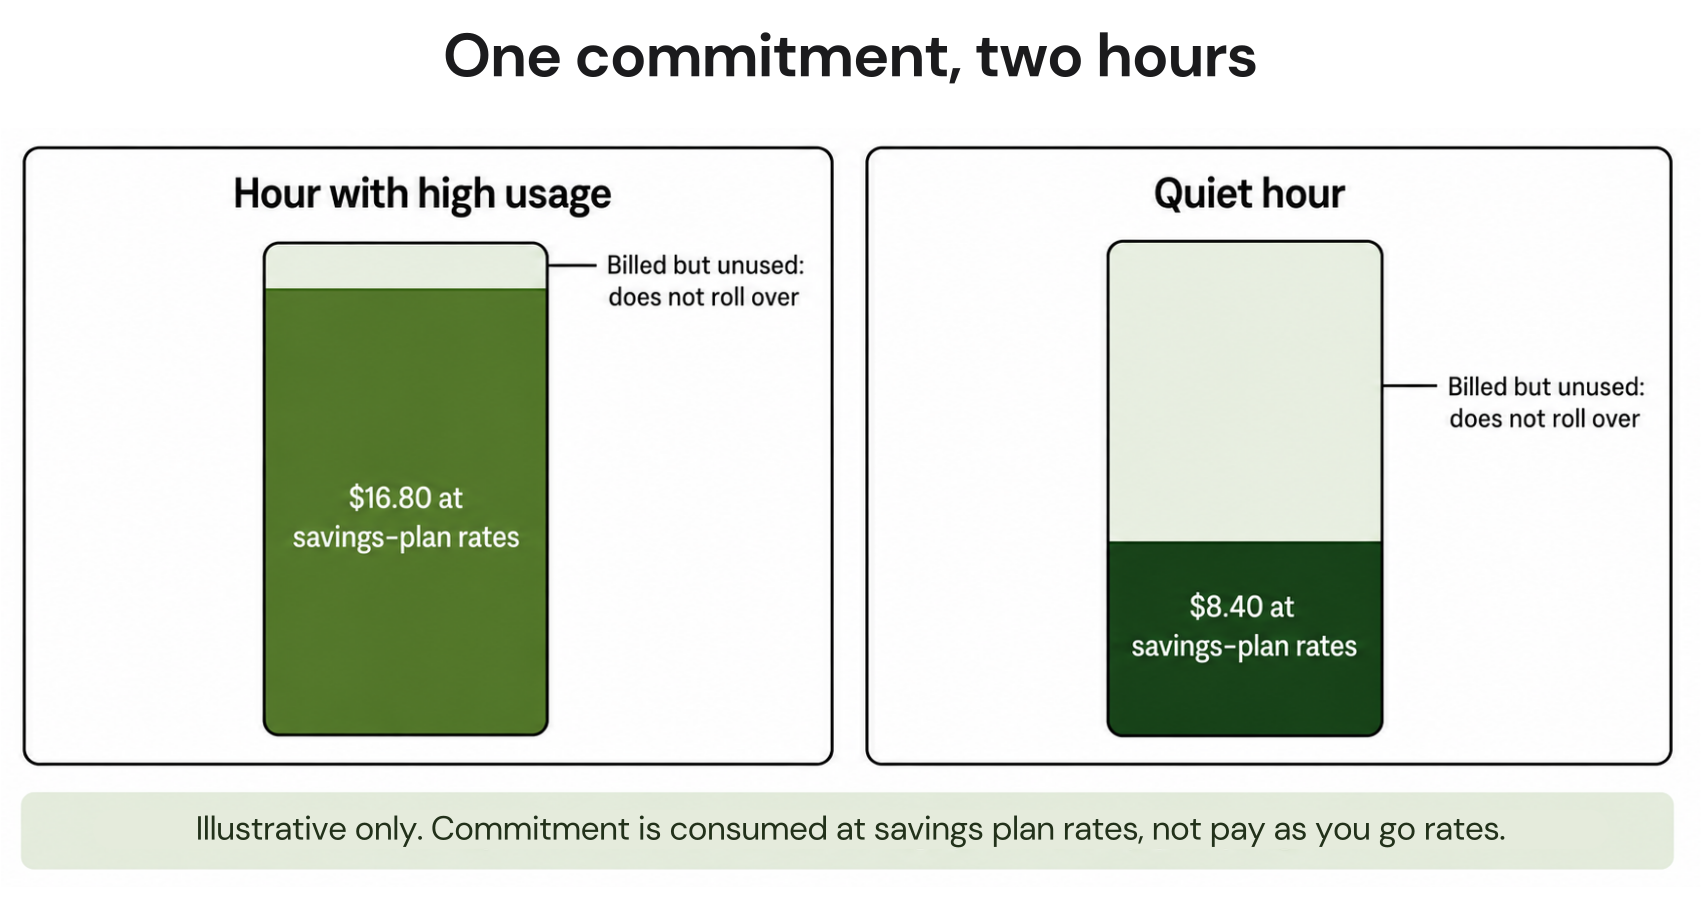
The billing mechanic runs on an hourly clock, and it is the single most important thing to understand before committing to anything, as detailed in Microsoft’s guide to how the savings plan discount is applied.You choose an hourly dollar commitment, for example $20 per hour. Every hour, Azure prices your eligible usage at savings-plan rates and deducts that discounted cost from your commitment. Whatever the discounted usage does not consume, you still pay and it does not roll into the next hour.
A busy hour. Say your eligible usage would cost $28 at pay-as-you-go rates and your plan carries a roughly 40% discount. At savings-plan rates that usage costs $16.80 under your $20 commitment. You pay a flat $20 for the hour, with $3.20 of commitment billed but unused.
A quiet hour. Eligible usage totals $14 at pay-as-you-go rates, or $8.40 at savings-plan rates. You still pay the full $20. The $11.60 gap is not a credit. It is gone.
Sustain that quiet-hour gap across 8,760 hours and it exceeds $100,000 a year in commitment paid for nothing. Because the commitment is consumed at discounted rates, sizing against pay-as-you-go values understates the waste which is why every dollar of commitment must be sized conservatively.
Figures are illustrative; rates vary by series, region, and OS.
What Savings Plans Cover and Exclude
Coverage differs meaningfully between the two products, and getting this wrong is one of the most common sizing mistakes. The full list of eligible services for Azure savings plans is on Microsoft’s pricing page.Compute Savings Plan
- Covers: all Azure VM series (except BareMetal Infrastructure and the Av1 series), including VMs used by AKS node pools, Azure Databricks, and Azure Virtual Desktop
- Covers: Azure Functions Premium plan, App Service Premium v3 and Isolated v2, Container Instances, Dedicated Host, Container Apps, and Spring Apps for Enterprise
- Does not cover: storage, networking, licensing charges, or any database service
Database Savings Plan
- Covers: compute for Azure SQL Database (including Hyperscale and serverless), SQL Managed Instance, PostgreSQL Flexible Server, MySQL Flexible Server, Azure Cosmos DB, Azure DocumentDB, and Database Migration Service
- Consumes commitment at pay-as-you-go rates, with no discount: SQL Server hourly licenses on Azure VMs and Azure Arc: a sizing hazard, since these charges eat commitment while generating zero savings
- Does not cover: storage, backup storage, or geo-replication
In Azure Cost Management, isolate savings-plan-eligible usage for the specific plan you are evaluating and exclude charges that the selected plan does not discount before calculating the baseline.
For the full database-side playbook, including discounts by service and tier: Azure Database Savings Plans: How to Buy & Optimize
How Much Can You Actually Save?
The honest range sits well below the headline. Microsoft’s published savings range and its basis is 11–65% for compute and 0–35% for databases and one independent Pricing Calculator walkthrough of a standard VM configuration landed at roughly 31% on a 1-year term and 53% on a 3-year term.Run your own configuration through the Pricing Calculator before sizing anything, since results vary by series, region, and OS. And remember the figures assume full utilization: drop to 75% a common outcome when a commitment is sized against peak rather than baseline and effective savings shrink while the committed amount stays fixed.
Utilization, not the headline discount rate, is what actually determines whether a Savings Plan was a good decision twelve months later.
How to Size Without Overcommitting
70% floor = hourly spend level your eligible usage meets or exceeds in 70% of hours (statistically, the 30th percentile of hourly spend)
Initial commitment = 70% floor × 0.70 to 0.80
Not your average. Not your peak.
Averages overcommit because half your hours run below them; peaks overcommit further.
The 70% floor is our internal sizing heuristic, not Microsoft guidance — cross-check it against Microsoft's 7-, 30-, and 60-day recommendation windows.
Step 2: Calculate your usage floor. Our internal heuristic, not Microsoft guidance, is the 70% floor: the hourly spend level your eligible usage meets or exceeds in 70–80% of hours, which in standard percentile terms is the 30th (or 20th) percentile of hourly spend.
It is not your average, and it is definitely not your peak committing to your average overcommits, because half your hours run below it. Compare the result against Microsoft’s recommendation windows (7-, 30-, and 60-day lookbacks) before settling on a figure.
Step 3: Set your initial commitment at 70–80% of that figure, adjusted for your organization’s documented risk tolerance. This leaves headroom for the variance that always shows up once real billing starts, and it deliberately under-shoots rather than over-shoots.
Step 4: Review for 30 days. Utilization consistently above 95% means you have room to layer a second, smaller commitment. Below 80% for two consecutive months is your signal something changed, a migration finished, a workload got decommissioned before you lock in more.
Azure Savings Plan vs Reserved Instances
Both are commitment-based discounts. The difference is what you are committing to.- A Savings Plan locks in a dollar-per-hour spend that follows your usage across any VM family, region, and OS.
- A Reserved Instance locks in a specific VM family, size, and region for a deeper discount up to 72% versus the Savings Plan’s 65% ceiling.
Choose Reserved Instances when a workload has run in the same configuration for six-plus months with no planned changes. When both apply to the same usage, Azure applies the Reserved Instance discount first, per Microsoft’s guidance on choosing between them.
2026 update. Starting July 1, 2026, Microsoft ended new purchases and renewals of Reserved VM Instances for 18 legacy series, including both 1- and 3-year terms for Dv3, Dsv3, Ev3, and Esv3. If your workloads run on these families, an RI is no longer an option at renewal; a Savings Plan for Compute is Microsoft’s primary recommended replacement. Verify your series in the legacy VM reservation transition guide. [Render as tinted/bordered note block]
| Your situation | Best instrument | Why |
|---|---|---|
| VM family or region will change during the term | Savings Plan | Discount follows spend, not a resource |
| Workload stable in same family and region for 6+ months | Reserved Instance | Up to 72% vs. 65% |
| VM series is Dv3, Dsv3, Ev3, or Esv3 | Savings Plan | New RI purchases unavailable from July 1, 2026 |
| Mixed estate: stable core plus evolving remainder | Both | Reserve the core; size a Savings Plan to the remainder's own usage floor |
Raising Coverage Without Added Lock-In Risk
Coverage should rise in response to evidence, not in a single leap of faith. Layer, do not lump: buy the initial plan at the usage floor from the steps above, then add a second, smaller commitment once 60–90 days of billing confirms the first is running above 90% utilization.Reserve the stable core with RIs and cover the flexible remainder with the Savings Plan. Put utilization reviews on a fixed calendar, Microsoft does not alert you when utilization drops. And know your exits before you need them: plans cannot be cancelled, but you can trade in eligible reservations and re-scope a plan at any time.
At term end, the discount expires and covers the resources bill at pay-as-you-go. Microsoft emails you 30 days before expiration, and optional auto-renewal is available.
For the full laddering and renewal playbook: Azure Commitment Management Strategy
Use 30 to 60 days of hourly usage, not daily or monthly averages that hide low-traffic hours.
Exclude storage, networking, and any charges the selected plan does not discount, such as SQL Server hourly licenses under a Database plan.
Commit at 70 to 80 percent of the level your usage meets or exceeds in 70 percent of hours.
Reserve the core; cover what may move with a Savings Plan.
Utilization is not alerted automatically; check it on a fixed calendar.
How to Buy an Azure Savings Plan
Purchasing takes about 15–20 minutes in the Azure portal under Cost Management + Billing → Savings Plans. Review the Azure Advisor recommendation as a starting reference, but enter your own floor-based hourly figure.Advisor and the portal purchase experience currently use a 30-day lookback only, while the Savings plan benefit recommendations API offers 7-, 30-, and 60-day windows and all of them highlight the commitment projected to maximize savings, not the conservative floor that protects against utilization drops.
For the full purchase walkthrough, including permissions and scope selection: Microsoft’s guide to buying a savings plan
How Usage.ai Fits Into Your Strategy
Everything above is a manual cycle: exporting hourly usage, calculating a conservative usage floor, isolating plan-eligible usage, and checking utilization on a calendar Azure will not set for you. We run that cycle continuously against your live billing data.We analyze your Azure usage and recommend qualifying commitments sized to stable eligible hourly spend, then purchase in increments as that baseline is confirmed rather than in a single upfront bet.
With Flex Insured Commitments, teams can get the up to 65% savings of a 3-year Azure Savings Plan for Compute with none of the commitment risk.
If eligible usage drops and a qualifying Azure Flex Commitment ends up costing more than the on-demand rate for that usage, we provide cashback protection on that difference, paid in real money rather than credits, subject to program terms.
Review your compute baseline, uncovered spend, and commitment risk.
Frequently asked questions
What is the difference between an Azure Savings Plan and a Reserved Instance?
A Savings Plan commits to a dollar-per-hour spend across any eligible VM family, region, and service. A Reserved Instance commits to a specific VM family and region for a deeper discount up to 72% versus 65%. Savings Plans suit evolving architectures; Reserved Instances suit stable workloads.
What happens if I don't use my full commitment?
Azure bills your full committed hourly amount every hour for the entire term. Unused commitment does not roll over and is not refunded. You can layer a second commitment or trade in an eligible reservation, but the original keeps billing regardless.
Can I cancel or modify an Azure Savings Plan after purchasing?
No. Savings Plans cannot be cancelled, modified, or refunded. You can trade in an eligible reservation toward a new plan (for Database Savings Plans, a trade-in starts a new 12-month term) and change the plan's scope at any time, but the hourly amount and term are fixed.
Does an Azure Savings Plan cover database services?
Compute Savings Plans do not cover databases. A separate product, Savings Plan for Databases, covers Azure SQL Database, SQL Managed Instance, PostgreSQL, MySQL, Cosmos DB, and DocumentDB at up to 35% savings. Storage is excluded from both plan types.
How do I size a commitment correctly?
Pull 30–60 days of hourly eligible usage from Azure Cost Management, filtered to the usage eligible for the plan you are evaluating. Calculate your usage floor, the spend level your usage meets or exceeds in 70–80% of hours, statistically the 30th–20th percentile of hourly spend, then commit at 70–80% of that figure. Never size against your average or peak; both overcommit.